

The Qomon MCP lets you connect your Qomon space directly to AI assistants like Claude, ChatGPT or any MCP-ready LLM. Qomon MCP gives your assistant live access to your Qomon infrastructure — contacts, actions, users, fundraising — allowing you to query live data in real time, perform actions directly from your assistant interface (edit, create list, actions etc.) and build tools on top of Qomon.
Before you get started
- Multi-Space Users: The MCP server authenticates via an API key linked to a specific Qomon space. Each space requires its own key and its own connector.
- You need a Qomon account with permission to create API keys. Not yet on Qomon, start and create a Qomon Space: https://start.qomon.app/create-account
- Qomon does not limit MCP by plan. It is available to all Qomon plans. Some AI assistants may require a paid or team plan to connect to MCP.
- Connecting an AI assistant may give that provider access to data from your Qomon space, including sensitive data. Check the provider’s privacy and data-use policies before connecting it.
To Start
Before connecting, generate an API key for your Qomon space:- Go to your Qomon space → Settings → Integrations & API
- Under Generate API Keys, click + Add
- Name your key (e.g.
mcp-claude / or /mcp-chatgpt for example) and copy the key — you’ll need it during setup
Connect Qomon MCP to your Claude
MCP Connector are available starting the Claude Team plan.
Once added at the organization level, all team members have access automatically — no individual setup required.
Once added at the organization level, all team members have access automatically — no individual setup required.
1
Open Claude settings
Go to claude.ai → Settings → Connectors.png?fit=max&auto=format&n=eva0FyaS1QYcDQkf&q=85&s=9367b0772b31714bab884d37899ae0f7)
2
Click on add a custom connector
.png?fit=max&auto=format&n=fuov2pKIh80Duxbd&q=85&s=d5cc167102d2058e15d96a5e7577e354)
3
Enter the MCP server URL: https://mcp.qomon.ai/mcp
In the Name field, enter .png?fit=max&auto=format&n=fuov2pKIh80Duxbd&q=85&s=85bb568679d85fe7d0ceb3941d119a0d)
qomon-mcp. In the “Remote MCP server URL” field, paste https://mcp.qomon.ai/mcp and click Add.4
Find the Qomon connector
Scroll to find qomon-mcp and click Connect.png?fit=max&auto=format&n=fuov2pKIh80Duxbd&q=85&s=2e371ae011d9c336c546726a1fe1b437)
5
Authenticate
An OAuth popup opens — paste your Qomon API key you generated on Step 1, select your region (Choose US if your Qomon Space is hosted in the United States, or Global if it is hosted anywhere else.) , and click Connect.png?fit=max&auto=format&n=fuov2pKIh80Duxbd&q=85&s=4fb0bbbc5ef716fe628ede960be2784f)
6
Start a new conversation
Open a new chat — You’re all set! Try asking Claude to search your contacts, list actions, build tools, leaderboards, add tags, create lists or browse fundraising data.png?fit=max&auto=format&n=fuov2pKIh80Duxbd&q=85&s=e5b5fb7e693d6625f25ab59d83297e55)
The Most Common Issues with Claude
Your CSRF validation failed
Your CSRF validation failed
Browser cookie issue. Retry in a private/incognito window.
Your Connector is not active after connecting
Your Connector is not active after connecting
Always open a new conversation — existing chats won’t pick up new connectors.
Your are not connected to the right Qomon space
Your are not connected to the right Qomon space
Each Qomon space needs its own connector and API key. Create one connector per space and name it clearly. Our tip: use the same name as your Qomon space.
Connect Qomon MCP to ChatGPT
Requires a Chat GPT Plus or Pro subscription with Developer Mode enabled.
1
Enable Developer Mode first
Go to chatgpt.com (web version) → Settings → Apps → Advanced settings → toggle Developer mode on, then click Create app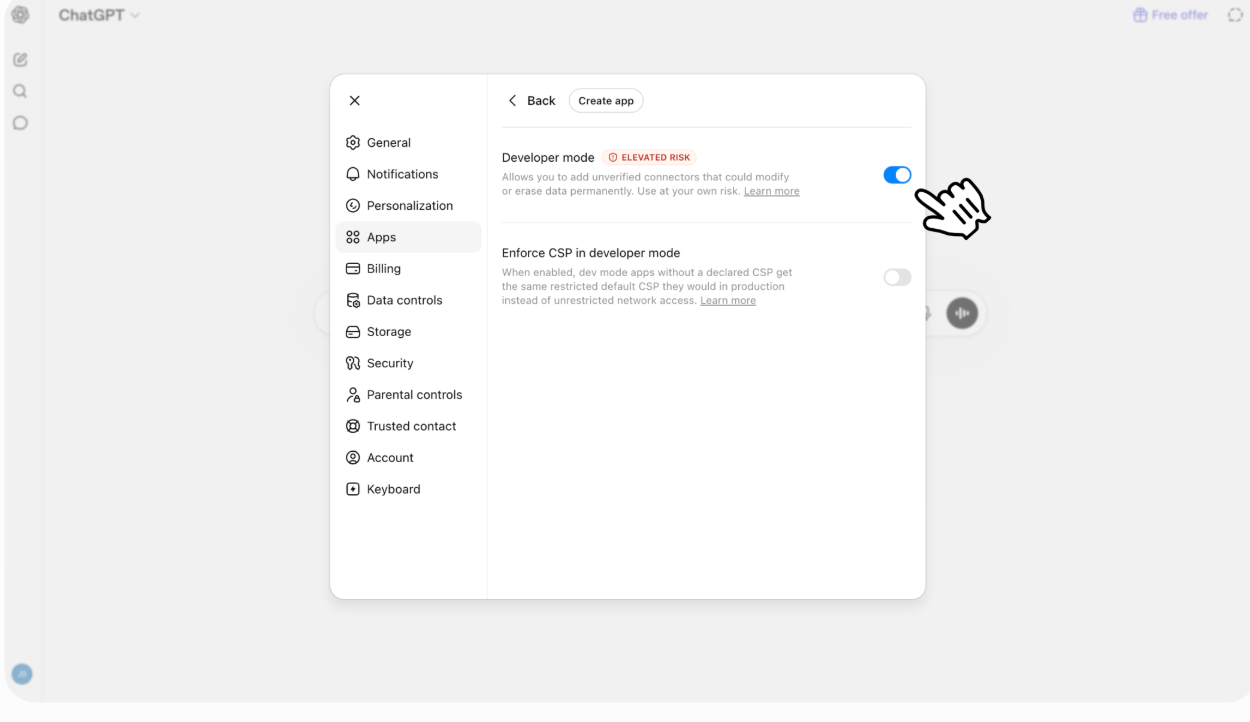
2
Create a new connector
3
Create a new connector
A “New App” form opens. Fill in: Name →
Connection → paste
Authentication → leave OAuth.
Check “I understand and want to continue” (of course if you understand and want to continue) and click Create.png?fit=max&auto=format&n=fuov2pKIh80Duxbd&q=85&s=5f203afe29c32922b7c790f1d1787e52)
Qomon, Connection → paste
https://mcp.qomon.ai/mcp,Authentication → leave OAuth.
Check “I understand and want to continue” (of course if you understand and want to continue) and click Create
4
Authenticate
A Qomon OAuth popup opens — select your region (Choose US if your Qomon Space is hosted in the United States, or Global if it is hosted anywhere else), paste your Qomon API key (from Step 1), and click Connect A Qomon OAuth popup opens — select your region (Choose US if your Qomon Space is hosted in the United States, or Global if it is hosted anywhere else), paste your Qomon API key (from Step 1), and click Connect-1.png?fit=max&auto=format&n=fuov2pKIh80Duxbd&q=85&s=741e9c1605690034f8a8079ae0a36227)
5
Enable in chat
New chat → click + → More → Developer Mode → Add sources → enable Qomon Connector
6
Qomon is now enabled!
Your Qomon app now appears under Enabled apps in Settings → Apps.png?fit=max&auto=format&n=fuov2pKIh80Duxbd&q=85&s=7283b6487ef7b3d4ea35975544d66b1a)
7
Start a new conversation
Open a new chat. You’re all set!
Try asking ChatGPT to search your contacts, list or take actions, build a leaderboard, or browse fundraising data.png?fit=max&auto=format&n=fuov2pKIh80Duxbd&q=85&s=d4946a1abf20cb4d4d9537893decda95)
Try asking ChatGPT to search your contacts, list or take actions, build a leaderboard, or browse fundraising data